Getting Started with AppSync JavaScript Resolvers: Basic Setup
Begin your journey towards a fruitful AppSync API

💻 Full Stack Software Engineer and ☁ Serverless Developer, focused on building efficient and cost-effective applications using cloud-based technologies
TL;DR: This article provides a step-by-step guide to setting up a new AppSync JS Resolvers project, including ESLint configuration, unit testing, and debugging. Learn how to use the AWS CLI command for testing resolver code, understand AppSync logs, and explore best practices for writing comprehensive unit tests.
Introduction
In the first article of this series, Mastering the Basics of AppSync JS Resolvers: A Quick Start, I shared the key insights I wish I had received before embarking on AppSync JS Resolvers.
In this article, as a follow-up to the first one, we will dive deeper and provide detailed steps to set up a new project and what the first steps would look like.
ESLint setup
For new joiners, ESLint is a static code analysis tool for identifying problematic patterns found in JavaScript code.
As we already know, the APPSYNC_JS runtime has some limitations, where not everything is allowed. There are some JS operations that are not supported and can't be used while developing JS Resolvers (for example: try-catch, async/await, third-party libraries, ...).
Thankfully, the AppSync team published an ESLint plugin to allow users to detect those unsupported operations and solve them before trying to push the code.
The provided plugin is fairly limited in what it will allow you to use and it was intended to be used only for developing we recommend to only set it up for the folder containing the resolver code.
General Configuration
As for the desired general ESLint configuration, you can go ahead and configure everything like you're already familiar with.
For our example, we went with installing:
ESLint
Prettier
airbnb-base plugin
All your configurations can be at the root of the project, you just need to take into consideration that whatever you configure at the root will affect all files in the project.
Configuration for Resolvers
In order to also apply the ESLint plugin provided by AppSync but limit it to only the resolver code, you will need to:
Create a folder where you will store all the AppSync Resolver code
Add a new
.eslintrcconfig file in that folder
That new config file could be like this:
{
  "extends": ["plugin:@aws-appsync/base"]
}
If you only need or want to implement the base linting configuration. Once configured, you will be able to see the linting issues detected by the different plugins.
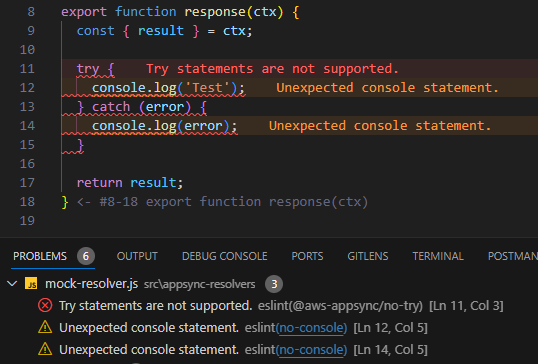
In this case, we can see the following:
Try statements are not supported- detected by theaws-appsyncESLint plugin, since try-catch statements are not allowed in JS resolvers.Unexpected console statement- detected by the default general rules that were applied project-wise in the prior step.
As always, I highly recommend you go through the official documentation to check all the different configuration options that are available.
Unit Tests
Following best practices, you should always aim to write extensive and comprehensive unit tests to ensure that the developed features work as expected and consequent updates don't break existing functionality.
When writing unit tests for JS resolvers you might find different complications that you might or might not know how to solve.
Here are the solutions that we found for two of the most common requirements (for jest testing framework).
Mocking @aws-appsync/utils
As of right now, there isn't an easy way to mock @aws-appsync/utils or test resolvers using that dependency using jest.
Mocking runtime global
While developing Javascript resolvers, one might also end up using runtime functionalities, for example, runtime.earlyReturn(...) to break the current execution.
export function request(ctx) {
  const { stash: { triggerEarlyReturn } } = ctx;

  if (triggerEarlyReturn) {
    runtime.earlyReturn({});
  }

  // Some logic that shouldn't be executed
  const result = { ... }
  return result;
}
If not handled properly, all unit tests written for those resolvers will fail directly, as these runtime functions are not defined in your local runtime environment.
const {
  request,
} = require('./myResolver');

describe('My test set', () => {
  const earlyReturnMock = jest.fn();

  beforeAll(() => {
    global.runtime = {
      earlyReturn: earlyReturnMock,
    };
    earlyReturnMock.mockImplementation(() => {
      throw new Error('earlyReturn');
    });
  });

  test('Happy Path Test', () => {
    const ctx = { ... };
    const expectedResult = { ... };
    const result = request(ctx);
    expect(result).toEqual(expectedResult);
    expect(earlyReturnMock).not.toHaveBeenCalled();
  });

  test('Early Return Test', () => {
    const ctx = { ... };
    expect(() => request(ctx)).toThrow('earlyReturn');
    expect(earlyReturnMock).toHaveBeenCalledTimes(1);
  });
});
By mocking and enabling it as shown in the example, the tests will stop breaking and one will be able to further test the expected behaviours.
Debugging Resolvers
One of the biggest pain points I faced when I started developing resolvers was how one could be able to debug them and find possible issues before they actually broke the CI/CD pipeline.
Here are a few insights on how one can do it with only the use of official AWS services.
AWS CLI command
The AWS CLI can be used to test resolver code by executing the following command:
aws appsync evaluate-code \
  --code file://resolver.js \
  --function request \
  --context file://context.json \
  --runtime name=APPSYNC_JS,runtimeVersion=1.0.0
Where, aws appsync evaluate-code tells the CLI the action that you'd like to do (in this case, evaluating the code for a resolver) and where one will need to provide the following input arguments:
--code: This argument is used to point to the code that one wants to test. the prefixfile://should be used when pointing to local files.--function: This argument defines the function to be evaluated, the possible options are eitherrequestorresponse--context: This argument is used to provide the context object that will be used to call your code.--runtime: This argument is used to select the runtime that will be used to evaluate the code. For JS resolvers one should always usename=APPSYNC_JS,runtimeVersion=1.0.0
One could expect the response of the execution to be in the following format:
{
   "error": {
      "codeErrors": [
         {
            "errorType": "string",
            "location": {
               "column": number,
               "line": number,
               "span": number
            },
            "value": "string"
         }
      ],
      "message": "string"
   },
   "evaluationResult": "string",
   "logs": [ "string" ]
}
The values that one could expect for each attribute are:
error: When provided in the response, this key will provide the details for the error thrown by the evaluation of the uploaded code.evaluationResult: This key will contain the response of the evaluated function (whatever the function returns) in string format, meaning that if an object is returned, one will receive the stringified value of the same.logs: This key will provide a list of all the generated logs during the code evaluation. This is especially useful to test/check for the output of anyconsole.logused in the code.
Please review the Official CLI command documentation or the official debugging guide for a more detailed description.
Sending Requests
The last step of testing and debugging your code will be to execute some End-to-End testing of your whole AppSync API.
In order to do this one could choose from a multitude of different tools to build and execute or send requests.
Here is a list of my recommended ways to do so:
AWS AppSync console: The built-in and probably easiest way of building and sending requests. My favourite feature of this approach is the built-in method to build the requests by selecting and providing only the required fields.
Graphbolt: My go-to tool when it comes to AppSync requests. Graphbolt allows you to test, debug and monitor your AppSync APIs from within the same UI. It even shows the Cloudwatch logs and X-Ray traces for each request!
Postman: There is probably no description needed here, but this would be the go-to if you're working on different API types at the same time or need to be able to easily share collections with your team.
Understanding AppSync Logs
One of the most challenging parts of debugging AppSync could be understanding the logs and all the information provided in them.
I highly recommend the latest article from Benoît Bouré where he explains Debugging AWS Appsync APIs with Cloudwatch logs.
As a little easter egg, make sure to check the last section of the blog post, where he goes over how one could use Graphbolt to make this process even faster and easier to understand.
Conclusion
Between the last article Mastering the Basics of AppSync JS Resolvers: A Quick Start and this one, we provided the most relevant information and first steps developers need to consider when getting started with an AppSync API that uses JS resolvers.
That said, now is the point for every reader to start developing its own API in order to better understand how AppSync works and the benefits that it could bring to your organization.
One of the biggest pain points that we have faced so far when developing for AppSync or GraphQL APIs with constantly changing schemas has been to generate or keep the collections updated.
In the next article, we will go over how the package gql-request-generator was developed and how one could use it (or even integrate it in a CICD pipeline) to easily keep all Collections up to date.
![[Video] DynamoDB for Relational People - AWS Community Day Turkiye 2025](/_next/image?url=https%3A%2F%2Fcdn.hashnode.com%2Fres%2Fhashnode%2Fimage%2Fupload%2Fv1759391824928%2Ff05a85d0-5353-4abb-bef6-3ef66e2f094f.jpeg&w=3840&q=75)


![[Webinar] DynamoDB - Common mistakes and how to optimize usage](/_next/image?url=https%3A%2F%2Fcdn.hashnode.com%2Fres%2Fhashnode%2Fimage%2Fupload%2Fv1722499330481%2F58678e4e-d77e-4acf-b76f-4c142504782b.png&w=3840&q=75)